Search engines play a crucial role in driving traffic to your WordPress website. To improve your site’s search engine optimization (SEO) and help search engines understand the structure of your content, it’s essential to include meta tags that indicate the relationships between different pages. One such pair of meta tags are “next” and “prev,” which indicate the order of paginated content. In this article, we’ll guide you through the process of adding next and prev meta tags to your WordPress site without using a plugin.
Why are Next and Prev Meta Tags Important?
Next and prev meta tags are essential for websites that have paginated content, such as blog posts, product listings, or article archives. These tags help search engines understand the logical sequence of pages in a series, ensuring that they’re properly indexed and presented in search results. They also enhance the user experience by providing clear navigation options for readers to move through paginated content.
Adding Next and Prev Meta Tags in WordPress
Here’s a step-by-step guide to adding next and prev meta tags to your WordPress website:
- Access Your Theme’s Header File: You’ll need to access your WordPress theme’s header.php file. This file is located in your theme’s directory and is used to define the structure of your website’s header section.
- Backup Your Website: Before making any changes to your theme files, it’s a good practice to back up your website. This ensures you can easily restore your site in case anything goes wrong during the editing process.
- Edit the header.php File: Open the header.php file in your preferred code editor. You can access this file through your WordPress dashboard by navigating to “Appearance” > “Theme Editor” and selecting the header.php file.
- Add Next and Prev Meta Tags: In the
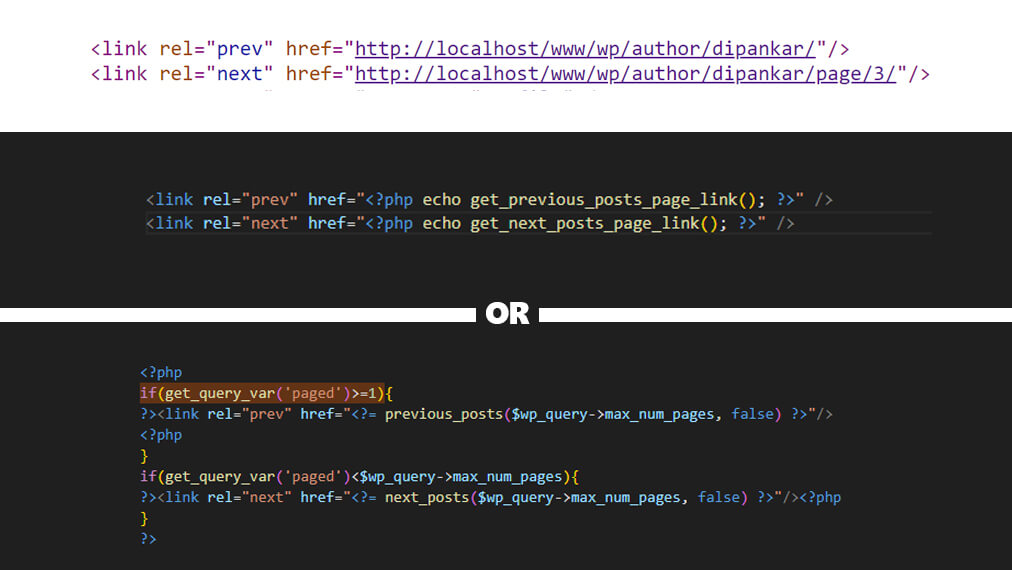
<head>section of your header.php file, add the following code:
<link rel="prev" href="<?php echo get_previous_posts_page_link(); ?>" />
<link rel="next" href="<?php echo get_next_posts_page_link(); ?>" />
These lines of code use WordPress functions to generate the appropriate URLs for the “prev” and “next” tags. They will automatically point to the previous and next pages of paginated content.
- Save Your Changes: After adding the code, save the changes to your header.php file.
- Test Your Website: Visit your website and navigate to paginated content, such as the second page of a blog post series. View the page source (usually by right-clicking and selecting “View Page Source” in your browser) and ensure that the next and prev meta tags are correctly included in the HTML head section.
- Check Your SEO: You can use various SEO tools and services to check the SEO status of your website and verify that the next and prev meta tags are being recognized by search engines.
Adding Condition Next and Prev Meta Tags
Integrate a PHP conditional statement to control the display of Next and Prev Meta Tags based on the availability of the next or previous page. This practice of selectively showing or hiding these tags is beneficial for optimizing user experience, as it minimizes unnecessary clutter and simplifies the navigation process. For example, it’s best to only present “Next Page” or “Previous Page” links when additional pages are accessible for navigation.
Let’s dive into a simple example of how to implement conditional Next and Prev Meta Tags using PHP.
<?php
if(get_query_var('paged')>=1){
?><link rel="prev" href="<?= previous_posts($wp_query->max_num_pages, false) ?>"/>
<?php
}
if(get_query_var('paged')<$wp_query->max_num_pages){
?><link rel="next" href="<?= next_posts($wp_query->max_num_pages, false) ?>"/><?php
}
?>
Conclusion:
Adding next and prev meta tags to your WordPress website without using a plugin is a straightforward process that can enhance your site’s SEO and user experience. By allowing search engines to understand the structure of your paginated content, you improve your chances of ranking higher in search results and provide a better navigation experience for your readers. This simple customization ensures that your WordPress site is better equipped for SEO, and it’s something you can easily do yourself with just a little knowledge of HTML and WordPress theme files.