Are you facing issues with your WordPress site where search engines aren’t indexing your pages due to the presence of <meta name=”robots” content=”noindex nofollow”? This can be a frustrating roadblock for website owners who want their content to be discoverable through search engines. Fortunately, there’s a simple solution to this problem, and AndamanTech is here to guide you through it.
I have previously mentioned in another blog post about how to remove the WordPress Robots Meta Tag noindex. You can refer to that blog post for updated information.
However, although the function described in that blog post works, there may still be instances where the noindex tag appears or does not change, particularly on search pages. Therefore, to ensure complete removal, you may need to remove the <meta name=”robots” content=”noindex nofollow”> tag from all pages, posts, categories, author pages, etc.
Here’s How to Remove Meta Name=”Robots” Content=”Noindex Nofollow” in WordPress:
Log in to your WordPress Admin Panel: Access your WordPress dashboard by entering your credentials.
Navigate to Appearance: Once logged in, go to the “Appearance” section. You’ll find it on the left-hand side of your dashboard menu.
Access Theme File Editor: Under “Appearance,” locate and click on “Theme File Editor.” This will open the editor where you can make changes to your theme’s files.
Acknowledge Understanding: Before proceeding, ensure that you understand the potential implications of modifying theme files directly. Click on any prompts that ask for confirmation.
Open Theme Functions (functions.php) file: In the Theme File Editor, search for and select the “Theme Functions (functions.php)” file. This file contains the functions that define your theme’s behavior.
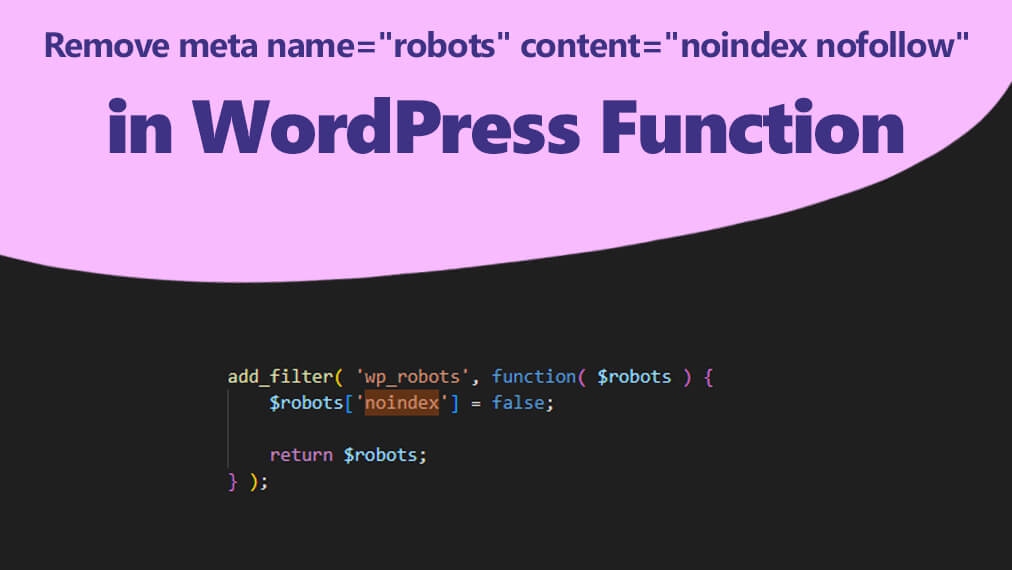
Add Code to Remove Noindex Nofollow Directive: Now, you can add the following code snippet to the bottom of your functions.php file:
This code snippet effectively removes the noindex nofollow directive and replaces it with index, follow, allowing search engines to crawl and index your pages as intended ?s={search_term_string}.
Important Note: Always make sure to back up your functions.php file before making any modifications. This ensures that you can revert to a previous version if needed.
By following these steps and implementing the provided code snippet, you can effectively remove the <meta name=”robots” content=”noindex nofollow” directive from your WordPress site, allowing search engines to properly index your content and improve your site’s visibility in search results.
With AndamanTech simple solution, you can ensure that your valuable content reaches a wider audience and achieves its intended impact. Say goodbye to indexing issues and hello to enhanced discoverability for your WordPress website!
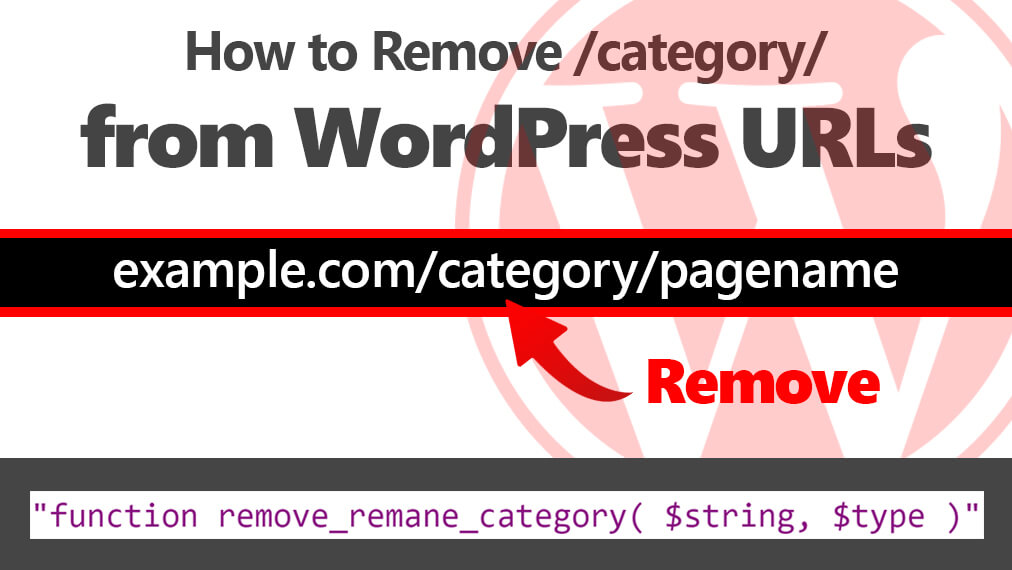
As a WordPress developer, you may have encountered the challenge of removing the “/category/” base from your website’s URLs. While this might seem like a daunting task, it can be accomplished with a few simple steps. In this article, we’ll guide you through the process, ensuring that your WordPress website’s URLs appear just the way you want them.
Why Remove /category/ from URLs?
WordPress categorizes posts into different categories, which is a useful feature for organizing content. However, the default URL structure includes “/category/” before the category name, making URLs longer and less user-friendly. By removing “/category/” from your URLs, you can create cleaner, more aesthetically pleasing links.
Prerequisites
Before you start, there are a couple of prerequisites to keep in mind:
Ensure that your web hosting server supports PHP version 8.0 or above. If not, you may need to upgrade your hosting plan or server to meet this requirement. This is essential because the method we’ll use to remove “/category/” relies on PHP functions introduced in newer versions.
Make sure you have access to your WordPress admin dashboard, as you’ll need it to modify the Permalinks settings and theme files.
Step 1: Adjust Permalinks Settings
The first step in removing “/category/” from your WordPress URLs involves tweaking the Permalinks settings. Follow these steps:
Log in to your WordPress admin dashboard.
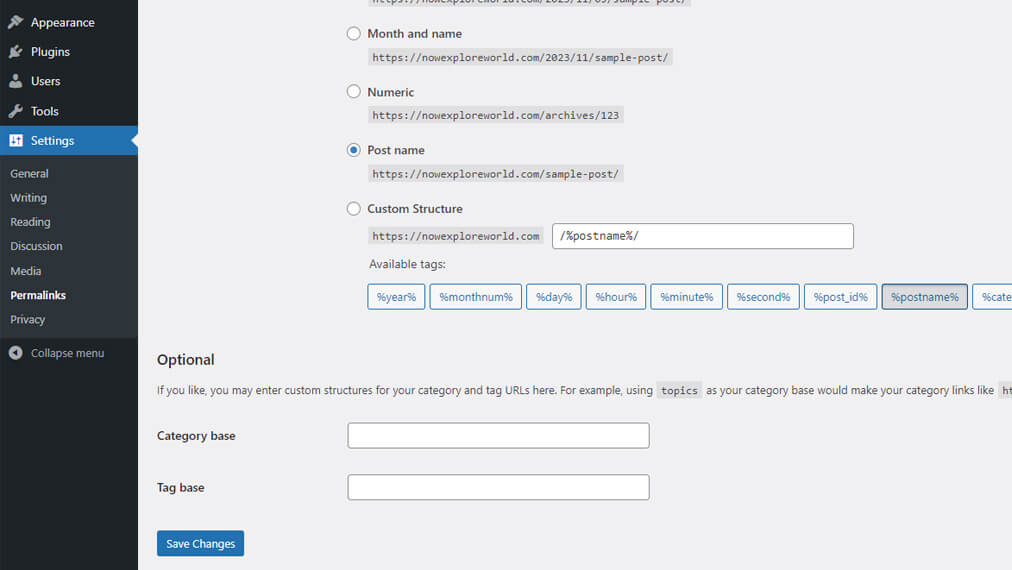
On the right-hand side menu, navigate to “Settings” and click on “Permalinks.”
In the Permalinks page, find the “Category base” field. By default, it’s set to “/category/.”
Replace “/category/” with your preferred base, or simply leave it blank for the best results. A common choice is to use a single character like a hyphen or a period (e.g., “-“). This will create cleaner, more user-friendly URLs.
Step 2: Edit Your Theme’s functions.php
The second step involves editing your theme’s functions.php file to ensure that the changes you made to the Permalinks settings take effect. Here’s what you need to do:
In your WordPress admin dashboard, go to “Appearance” and click on “Theme Editor.”
In the Theme Editor, select the “functions.php” file on the right-hand side.
Add the following code to the end of the functions.php file:
By following these two simple steps, you can successfully remove “/category/” from your WordPress website’s URLs. This not only makes your links look cleaner but also enhances the user experience. Remember that changing your category base also allows you to customize your URLs further.
Keep in mind that altering your website’s core settings and theme files may carry some risks. Always make a backup of your website and its files before making any changes. This way, you can restore your website if something goes wrong.
WordPress is a dynamic platform that evolves with each update, making it essential for website owners and developers to stay current with best practices. One important aspect of optimizing your WordPress website for search engines is managing the Robots Meta Tag. This tag instructs search engine crawlers on how to index your site’s pages. To ensure your website is always up-to-date and functioning correctly, it’s important to use the latest techniques. In this article, we’ll guide you through the process of removing the noindex directive from your WordPress site’s Robots Meta Tag and show you the most current methods.
Step 1: Removing the Robots Meta Tag from WordPress
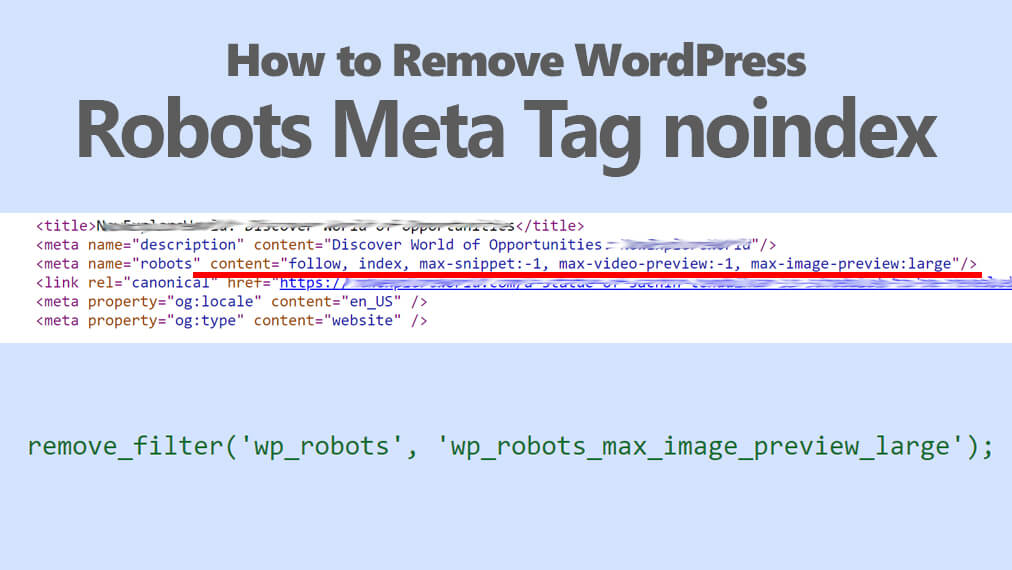
The first step is to remove the noindex directive from the Robots Meta Tag. This tag is often used to prevent search engines from indexing specific pages or entire websites. Here’s how you can do it:
Log in to your WordPress admin dashboard.
Navigate to your theme’s functions.php file. You can find it under “Appearance” -> “Theme Editor” in the WordPress dashboard.
In the functions.php file, scroll to the bottom to ensure that your code does not interfere with existing functions or features. It’s best practice to create a child theme if you’re not already using one.
Add the following code to remove the noindex directive from the Robots Meta Tag:
This code will override the default noindex directive and instruct search engines to follow and index your pages. Make sure to save the changes.
Step 2: Adding the Robots Meta Tag Manually
Once you’ve removed the noindex directive using the code mentioned earlier, you might also consider including a customized Robots Meta Tag on particular pages or posts. This will grant you more precise control over how search engines handle the indexing of your content.
To implement this, access the WordPress theme folder and locate the header.php file. Open this file and place the following code snippet right after the <meta charset="<?php bloginfo( 'charset' ); ?>"> line:
Find the <head> section within the HTML code.
Within the <head> section, insert the following code snippet:
This code imparts the same directives as described in the preceding step, ensuring that search engines appropriately follow and index the content specific to this page.
Conclusion
Optimizing your WordPress website for search engines is an ongoing process, and managing the Robots Meta Tag is an essential part of it. By using the latest techniques and WordPress hooks, you can effectively remove the noindex directive and control how search engines index your site. Remember to regularly check for updates in WordPress and keep your theme and plugins up to date to ensure that your code works seamlessly. With these steps, you’ll have greater control over how your WordPress website appears in search engine results pages, ultimately improving its visibility and discoverability.
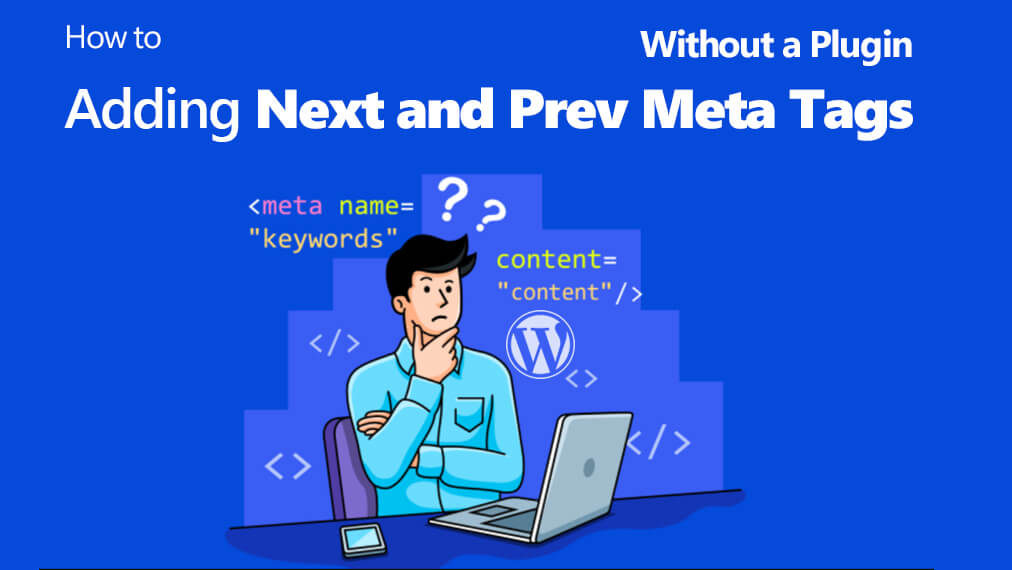
Search engines play a crucial role in driving traffic to your WordPress website. To improve your site’s search engine optimization (SEO) and help search engines understand the structure of your content, it’s essential to include meta tags that indicate the relationships between different pages. One such pair of meta tags are “next” and “prev,” which indicate the order of paginated content. In this article, we’ll guide you through the process of adding next and prev meta tags to your WordPress site without using a plugin.
Why are Next and Prev Meta Tags Important?
Next and prev meta tags are essential for websites that have paginated content, such as blog posts, product listings, or article archives. These tags help search engines understand the logical sequence of pages in a series, ensuring that they’re properly indexed and presented in search results. They also enhance the user experience by providing clear navigation options for readers to move through paginated content.
Adding Next and Prev Meta Tags in WordPress
Here’s a step-by-step guide to adding next and prev meta tags to your WordPress website:
Access Your Theme’s Header File: You’ll need to access your WordPress theme’s header.php file. This file is located in your theme’s directory and is used to define the structure of your website’s header section.
Backup Your Website: Before making any changes to your theme files, it’s a good practice to back up your website. This ensures you can easily restore your site in case anything goes wrong during the editing process.
Edit the header.php File: Open the header.php file in your preferred code editor. You can access this file through your WordPress dashboard by navigating to “Appearance” > “Theme Editor” and selecting the header.php file.
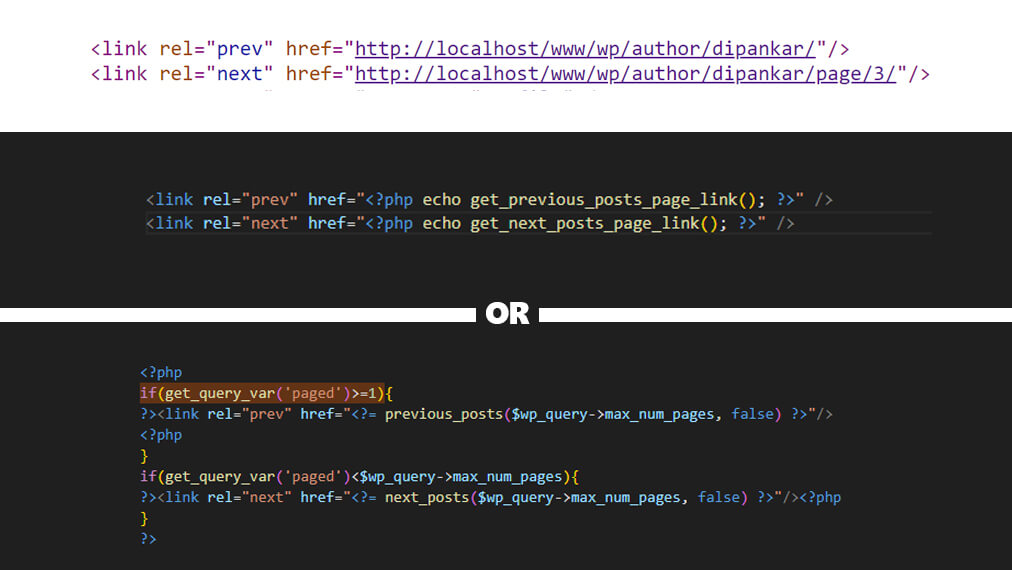
Add Next and Prev Meta Tags: In the <head> section of your header.php file, add the following code:
These lines of code use WordPress functions to generate the appropriate URLs for the “prev” and “next” tags. They will automatically point to the previous and next pages of paginated content.
Save Your Changes: After adding the code, save the changes to your header.php file.
Test Your Website: Visit your website and navigate to paginated content, such as the second page of a blog post series. View the page source (usually by right-clicking and selecting “View Page Source” in your browser) and ensure that the next and prev meta tags are correctly included in the HTML head section.
Check Your SEO: You can use various SEO tools and services to check the SEO status of your website and verify that the next and prev meta tags are being recognized by search engines.
Adding Condition Next and Prev Meta Tags
Integrate a PHP conditional statement to control the display of Next and Prev Meta Tags based on the availability of the next or previous page. This practice of selectively showing or hiding these tags is beneficial for optimizing user experience, as it minimizes unnecessary clutter and simplifies the navigation process. For example, it’s best to only present “Next Page” or “Previous Page” links when additional pages are accessible for navigation.
Let’s dive into a simple example of how to implement conditional Next and Prev Meta Tags using PHP.
Adding next and prev meta tags to your WordPress website without using a plugin is a straightforward process that can enhance your site’s SEO and user experience. By allowing search engines to understand the structure of your paginated content, you improve your chances of ranking higher in search results and provide a better navigation experience for your readers. This simple customization ensures that your WordPress site is better equipped for SEO, and it’s something you can easily do yourself with just a little knowledge of HTML and WordPress theme files.
Do you ever wonder why you’ve chosen to read this particular article? Well, we have the answer! – You’re here because we’ve skillfully incorporated meta tags into this blog. This strategic move ensured its accessibility when you entered your query into the search bar, or perhaps you simply enjoy perusing our content.
Today, we’ll take a deep dive into the world of meta tags, exploring what they are, how to add them properly in WordPress, and the benefits they bring to your website.
If you find yourself in need of assistance with your WordPress website, don’t hesitate to reach out to AndamanTech, the WordPress website support services. We can assist you in setting up your website efficiently and affordably.
What Are Meta Tags?
Meta tags are concise snippets of HTML code that help search engines understand the content of your webpage. Correctly adding meta tags in WordPress ensures that search engines present your page effectively. Neglecting this step might result in your page getting lost in the sea of other websites.
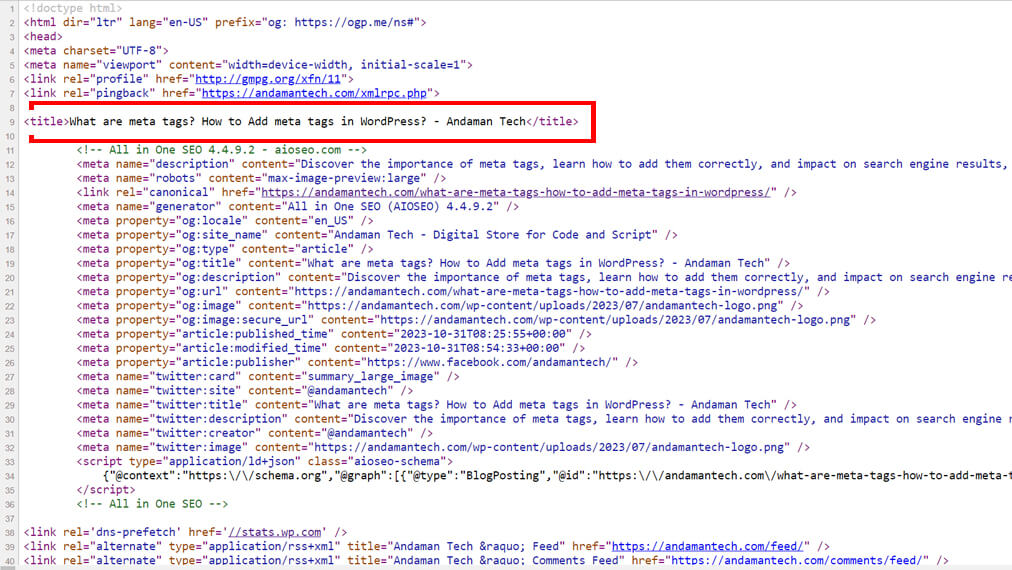
Adding meta tags to a WordPress site is one of the most critical SEO techniques. To view the meta tags of a page, simply press Ctrl+U.
What Is a Meta Tag Example?
Today, we aim to introduce you to the six primary types of meta tags that can optimize your website to the fullest:
Title Meta Tag: Title tags are the most commonly used meta tags on web pages, and they are the first things visible to search engines and users. Titles should be concise, clear, and contain the primary keyword. The title tag format is: <title>Meta tag example</title>.
Description Meta Tag: The description meta tag provides a brief, clear description of the page’s content, displayed just below the title meta tag. The description meta tag format is: <meta name="description" content="Your description here">.
.=Keyword Meta Tag: Keyword meta tags consist of top keywords that accurately describe your content. To find the keywords on a page, press Ctrl+U and search for the line beginning with <meta name="keywords">.
Alternative Text for Images: Alt tags are written for images, allowing search engines to index them. They ensure that users can understand the image, even if it doesn’t load. Alt tag format is: <img src="your-image.jpg" alt="Your alt text">
Canonical Meta Tag: Use the Canonical tag for similar pages to indicate the main one, preventing duplicate content issues. The Canonical tag format is: <link rel="canonical" href="your-canonical-url">
How Meta Tags Improve WordPress SEO
Meta tags have a significant impact on your page’s SEO. If they were irrelevant, Google wouldn’t recommend manually writing headings, titles, and meta tags to enhance your site’s search engine optimization.
WordPress offers numerous features, but it’s essential not to overload your site with excessive plugins. Adding meta tags is crucial as it expedites your appearance in Search Engine Results Pages (SERPs).
How to Add Description and Keyword Meta Tags
You can add description and keyword meta tags in two primary ways:
Use Yoast SEO Plugin: Install the Yoast SEO plugin, enter keywords, and descriptions for your pages.
Add Meta Tags Manually: Open header.php via File Manager or SFTP, find the <head> tag, and add meta tags like <meta name="keywords" content="your keywords"/> and <meta name="description" content="your meta description".
How to Add Alternative Text for Meta Tags
To add alternative text to an image, use a suitable plugin, describe the image, and add it to your site during publication.
How to Add the Canonical Meta Tag
There are two main methods to add a Canonical meta tag to your site:
Yoast Plugin: Use the Yoast plugin.
RankMath: Alternatively, you can use RankMath.
Top 7 Tips for Creating Effective Meta Tags
Don’t overstuff your page with metadata.
Choose clear and relevant keywords.
Keep metadata concise.
Use unique meta tags for each page.
Incorporate keywords into your meta tags.
Avoid passive voice.
Make each tag unique.
In Conclusion
Adding meta tags to your WordPress website is paramount for your site’s success. Meta tags are essential for optimizing your site’s SEO. We hope you found our blog helpful in this regard.
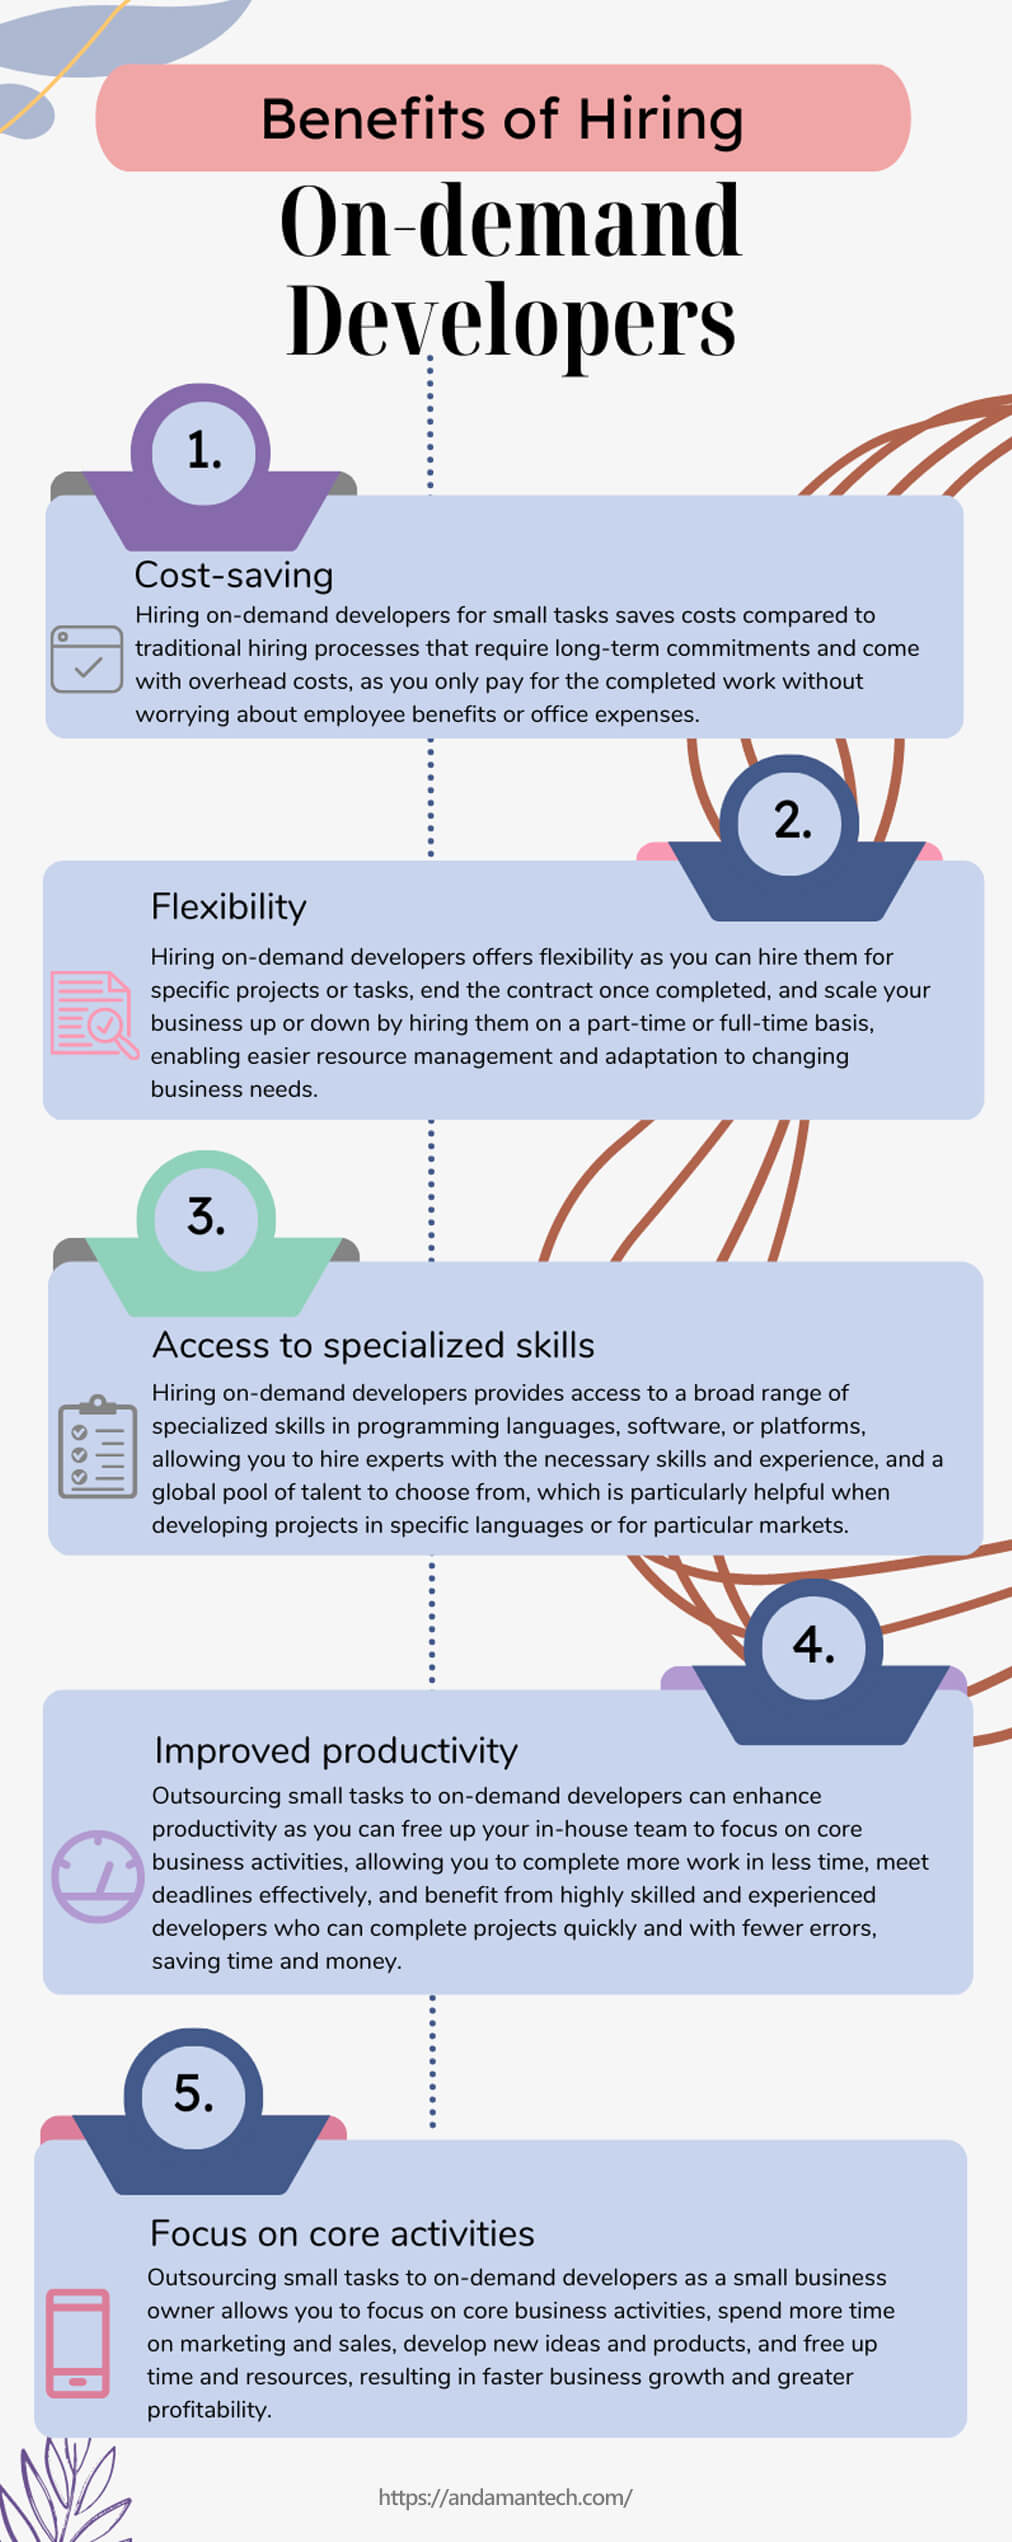
As a small business owner, you continually seek ways to optimize your resources and reduce costs. One effective approach is to outsource specific tasks, especially those requiring specialized skills. Hiring on-demand developers for smaller tasks can prove to be a cost-effective solution, offering numerous benefits to your business. In this article, our web development company will delve into the advantages of enlisting on-demand developers for small-scale assignments and explain why it’s a savvy choice for your business.
Understanding On-Demand Developers
Comprehending on-demand developers means understanding highly skilled professionals who offer development services to businesses and individuals on a project-by-project basis. These developers are usually experts in a particular programming language or development platform, and they are available for hire to handle a wide range of tasks, from minor assignments to complex projects.
On-demand developers often work as freelancers, operating independently and managing multiple projects concurrently. They can also be found on online platforms like Upwork or Freelancer, where businesses can post their projects and receive proposals from developers interested in taking on the tasks.
The main benefit of utilizing on-demand developers is that it provides businesses with access to a pool of talented professionals with the exact skills and experience needed for their projects. This approach can save both time and money by eliminating the need to hire full-time employees or invest in training existing staff to acquire new skill sets.
On-demand developers offer a broad spectrum of services, encompassing web development, mobile app development, software development, and database management. Moreover, they can deliver specialized services such as cybersecurity or artificial intelligence development.
In conclusion, on-demand developers are a flexible and cost-effective option for businesses and individuals in need of development services, whether for small tasks or extensive projects. These professionals possess the skills and experience required for successful project completion and can be engaged on a project-specific basis, making them an attractive choice for businesses of all sizes.
Benefits of Employing On-Demand Developers for Your Business
Cost Savings: One of the primary advantages of hiring on-demand developers for small tasks is cost savings. Traditional hiring processes can be expensive, time-consuming, and often entail a long-term commitment. On the other hand, hiring on-demand developers means you only pay for the work that’s completed. There are no overhead costs or employee benefits to worry about. This allows you to save money on office space, equipment, and other expenses related to maintaining a full-stack web development team.
Flexibility: Another benefit of hiring on-demand developers is flexibility. You can bring in a developer for a specific project or task, and once the project concludes, you can terminate the contract. This flexibility enables you to scale your business up or down as needed. You can also hire developers on a part-time or full-time basis, depending on the workload. This makes it easier to manage your resources and adapt to changing business needs.
Access to Specialized Skills: When you hire on-demand developers, you gain access to a wide range of specialized skills. You can hire developers with experience in specific programming languages, software, or platforms, such as WordPress or Drupal. This ensures that your project is handled by an expert with the necessary skills and experience. Hiring on-demand developers also provides access to a global talent pool, which can be particularly useful if you need to develop a project in a specific language or for a particular market.
Improved Productivity: Outsourcing small tasks to on-demand developers can enhance your productivity. When you hire developers for specific projects, you free up your in-house team to concentrate on core business activities. This means you can accomplish more work in less time and meet your deadlines more effectively. On-demand developers are typically highly skilled and experienced in their field, allowing them to complete projects faster and with fewer errors, ultimately saving you time and money in the long run.
Focus on Core Activities: As a small business owner, your time is valuable. By outsourcing small tasks to on-demand developers, you can direct your attention to core business activities. This allows you to invest more time in marketing, sales, and other activities that directly impact your business’s growth and success. It also enables you to use your time to develop new ideas and products, rather than getting bogged down in routine tasks. By outsourcing small tasks to on-demand developers, you can free up your time and resources, helping your business grow faster and become more profitable.
Different Types of On-Demand Developers
On-demand developers come in various types and possess varying levels of expertise and experience. Here are some of the most common categories of on-demand developers:
Web Developers: These experts specialize in creating websites and web applications, utilizing programming languages like HTML, CSS, and JavaScript for building web pages with interactivity and functionality. Web developers can work on front-end development, back-end development, or full-stack development.
Mobile App Developers: These specialists focus on developing applications for mobile devices, including smartphones and tablets. They can create apps for both iOS and Android platforms using programming languages like Swift, Objective-C, Java, and Kotlin. Mobile app developers can produce native apps, hybrid apps, or web apps based on client requirements.
Software Developers: These professionals are adept at designing software applications for desktops, servers, and other devices. They use programming languages like C++, Java, Python, and Ruby to develop software tailored to meet the client’s needs. Software developers can create custom software, enterprise software, or open-source software, depending on project requirements.
Data Scientists: Data scientists are skilled in analyzing and interpreting large datasets. They utilize statistical analysis and machine learning algorithms to uncover patterns and insights from data. Data scientists can work on data mining, data visualization, data modeling, or data analysis projects.
Website Security Experts: These experts specialize in securing websites and web applications from potential cyber attacks and data breaches. They possess in-depth knowledge of web technologies and security best practices, allowing them to identify vulnerabilities in websites and web applications. They also implement appropriate security measures, such as firewalls, intrusion detection systems, and encryption protocols, to safeguard websites from potential threats. Website security experts play a crucial role in protecting sensitive information and ensuring the integrity and availability of websites and web applications.
Artificial Intelligence Developers: These specialists focus on developing software and systems capable of performing tasks that traditionally require human intelligence, such as natural language processing, image recognition, and decision-making. They use programming languages such as Python, Java, and C++ to create AI algorithms and applications.
On-demand developers are available in different types and levels of expertise and experience. By understanding the various categories of on-demand developers, businesses can identify the right professional for their project, ensuring optimal results.
When to Engage On-Demand Developers
Businesses have diverse needs when it comes to software development. In some cases, hiring an on-demand developer can be more advantageous than hiring a full-time employee. Here are some situations where engaging an on-demand developer can prove beneficial:
Short-Term Projects: If you have a short-term project requiring specialized skills, it may be more cost-effective to hire an on-demand developer instead of a full-time employee. On-demand developers can work on the project for its duration and then transition to other projects once it’s completed. This can save businesses money on employee salaries, benefits, and training.
Tight Deadlines: For projects with tight deadlines, engaging an on-demand developer can expedite project completion. On-demand developers can commence work on the project immediately, without the need for extensive onboarding or training. This can be particularly valuable for businesses facing sudden surges in demand or unexpected projects requiring swift completion.
Specialized Skills: If your business necessitates specialized skills that are not available in-house, hiring an on-demand developer can provide a solution. On-demand developers possess specific expertise in particular programming languages or technologies, which can benefit businesses lacking these skills internally. This can be especially advantageous for businesses seeking to develop new software applications or systems.
Cost Savings: Engaging an on-demand developer can also be cost-effective for businesses. Businesses are not obligated to provide benefits, training, or office space for on-demand developers. This can lead to long-term cost savings, especially if there is no ongoing need for full-time employees.
Hiring on-demand developers can be advantageous for businesses with short-term projects, tight deadlines, specialized skills requirements, or cost-saving objectives. By engaging on-demand developers, businesses can access the expertise they need without the long-term commitment of full-time employees.
How to Find the Right On-Demand Developer
Finding the right on-demand developer can be a challenging task, especially if you are unfamiliar with the process. Here are some tips to help you locate the appropriate on-demand developer for your small tasks:
Define Your Requirements and Goals: Before commencing your search for an on-demand developer, it is essential to define your requirements and goals. What kind of task do you require assistance with? What are your specific requirements and expectations? What is your budget? By clearly defining your requirements and goals, you can narrow your search and locate a developer with the necessary skills and experience to complete your project.
Use Online Platforms: Numerous online platforms connect businesses with on-demand developers, such as Upwork, Freelancer, and Toptal. These platforms enable you to post your project and receive proposals from developers interested in working with you. You can also search for developers based on their skills, experience, and location. It is advisable to read reviews and ratings before hiring a developer to ensure they possess a solid track record.
Seek Referrals: Another approach to finding on-demand developers is to request referrals from other business owners or colleagues who have previously worked with on-demand developers. They can provide valuable insights and recommendations based on their own experiences.
Review Portfolio and Experience: When selecting an on-demand developer, be sure to review their portfolio and experience. Look for developers who have worked on projects similar to yours in the past and possess the requisite skills and expertise to complete your project. You can also request references from previous clients to gain a better understanding of their work and professionalism.
Assess Their Skills: Prior to hiring an on-demand developer, you can assess their skills by assigning a small task for them to complete. This will allow you to evaluate their skills and communication style, and determine if they are a good fit for your project. It also offers an opportunity to see their work firsthand and gauge the quality of their output.
Communicate Clearly: To ensure successful project completion, it is crucial to maintain clear communication with your on-demand developer. Provide precise instructions, establish realistic deadlines, and offer feedback throughout the project. Additionally, establish a system for tracking progress and milestones to ensure the project remains on track.
Fair and Prompt Payment: Finally, it is important to pay your on-demand developer fairly and promptly. This fosters a positive relationship with them and ensures they are motivated to undertake future projects for your business. Establish a clear payment schedule and ensure all payments are made on time.
Finding the right on-demand developer for your small tasks can be a daunting endeavor, but by adhering to these guidelines, you can enhance your chances of identifying a developer with the essential skills and experience to successfully complete your project. Remember to define your requirements and goals, utilize online platforms, seek referrals, review portfolios and experience, assess skills, communicate clearly, and ensure fair and punctual payment. By following these steps, you can locate a reliable and skilled on-demand developer capable of helping your business thrive and achieve its objectives.
WordPress is a powerful content management system that allows you to create and manage various types of content on your website. Sometimes, you may need to retrieve the current URL of your WordPress site when you’re on specific pages like Category or Author Pages. In this article, we’ll explore how to get the current URL in WordPress when you’re on Category or Author Pages.
Understanding Category and Author Pages
Before diving into the code, let’s briefly understand what Category and Author Pages are in WordPress:
Category Pages: These are pages that display a list of posts categorized under a specific topic or category. For example, you might have a Category Page for “Technology” that displays all posts related to technology.
Author Pages: These pages showcase posts authored by a specific writer on your website. Each author typically has their own page with a list of their published articles.
Getting the Current URL Using PHP
To obtain the current URL on Category or Author Pages, you can use WordPress functions and variables. You can place this code in your theme’s template files or in a custom plugin.
You can utilize the following PHP function to obtain the current page/post’s slug. This code is versatile and functions correctly, whether it’s an archive page or a single post, for any page type within WordPress.
The WordPress slug is the text that comes after your domain name. For example, in the URL “yoursite.com/about/”, the slug is “about.” It provides a valuable method to uniquely identify content in a user-friendly way.
In conclusion, grasping the method for obtaining the current URL in WordPress through a PHP code snippet opens up a realm of opportunities for tailoring and refining your website. Equipped with the comprehensive guidance provided in this article, you can now apply this technique with confidence, propelling your WordPress development expertise to new heights.
If you’re using a custom theme in WordPress and you want to get the current page number or modify your meta tags, you can achieve this through custom development. Here’s how you can approach both tasks
Get the Current Page Number
To get the current page number in WordPress, you can use the get_query_var('paged') variable. This is often used in combination with the main query or a custom query on your page template. For example:
This code sets the get_query_var('paged')variable to the current page number. You can use this variable to control the content you display on different pages of your site.
Modify Meta Tags
To modify meta tags in your custom theme, you would typically want to customize the header of your theme. You can do this by creating a child theme online free or modifying your custom theme directly.
Here are the steps to modify meta tags:
Locate the header.php file in your theme directory.
Inside the <head> section of the header.php file, you can add or modify meta tags. For example, to add a custom description meta tag:
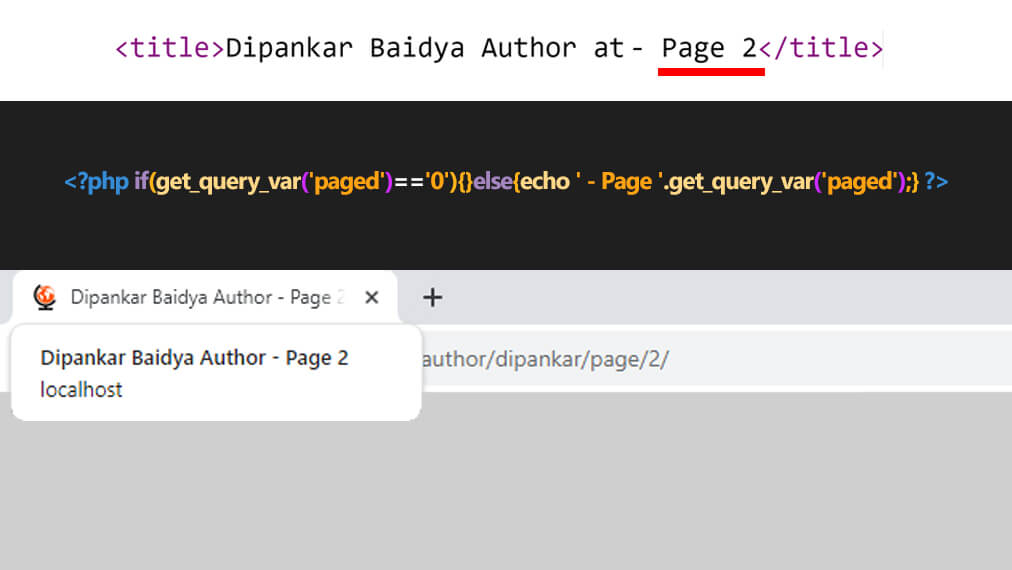
To dynamically modify meta tags based on the currently displayed page, conditional statements and WordPress can be employed. It’s worth noting that the code provided previously does not differentiate page numbers; it displays the same content for all page numbers.
In the provided code snippet, we’re examining whether the current page is a single post or a loop page, such as a category page, author page, or tag page. We then dynamically adjust the page title to suit the context.
Please bear in mind that when making alterations to your theme’s code, it’s essential to exercise caution. It is highly advisable to implement changes using a child theme to prevent your modifications from being overwritten during theme updates. Additionally, always maintain a backup of your website before embarking on substantial theme modifications.
The practice of displaying an author’s biographical information or author description is a common consideration for WordPress developers. Their primary motivation is to improve the user experience and offer a better understanding of the author. Sometimes, users might face issues related to this when a theme fails to update for various reasons, resulting in the absence of author bio information or the author’s name not being visible. In such situations, developers can readily integrate the display of author bio information through a simple WordPress function.
In WordPress, showcasing an author’s biographical information or a detailed author description is a task that developers can accomplish through various methods, adding depth and personalization to the user experience. To achieve this, developers often rely on specialized functions like get_bloginfo() or leverage the vast capabilities of the WordPress API to access and manipulate author-related data. These methods offer a high degree of flexibility, allowing developers to tailor the presentation of this information to suit the website’s unique design and content needs.
<?php echo get_bloginfo(); ?>
For instance, developers can integrate the author’s biography into the author’s profile, providing readers with a richer understanding of the author’s background, expertise, and interests. Furthermore, they can include this information at the conclusion of each post, establishing a deeper connection between the author and the content. Additionally, the information can be showcased on a dedicated author archive page, offering a comprehensive view of an author’s contributions to the website.
The act of displaying author information in such a manner is not merely a technical task; it is a user-focused feature that significantly enhances the overall user experience. By introducing the human element of the author, readers can relate on a more personal level, fostering engagement and loyalty. This added layer of transparency and authenticity not only enhances the aesthetics of the website but also strengthens the sense of community and trust, ultimately leading to a more immersive and gratifying WordPress website or blog experience.
In WordPress theme development, you might want to echo or get the author’s name for various reasons. The author’s name is associated with each post or page on a WordPress website, and it can be useful for displaying information about the content’s creator. Here are some common scenarios where you might want to display or retrieve the author’s name
Displaying the Post Author: Showcasing the author’s name is a means of acknowledging and giving credit to the content creator, a practice that contributes to transparency and enhances the credibility of your content.
Custom Templates: When crafting customized templates for specific post types, it often becomes necessary to incorporate the author’s name into the template layout to create a cohesive and informative presentation.
Author Archives: WordPress automatically generates author archives that compile all the posts attributed to a particular author. In these archives, it’s customary to showcase the author’s name alongside a brief biography to provide context.
Author Information Widgets: Widgets or elements in the sidebar that offer insights into the author typically include elements such as the author’s name, profile picture, and a concise bio, adding a personal touch to your website.
Author-Specific Styling: There may be instances where you want to apply unique styles to content based on the author. For example, you could emphasize the author’s name or employ different color schemes for different authors to distinguish their contributions.
To accomplish the task of echo or obtaining the author’s name within a WordPress author page or archives, you can harness a variety of add to your theme header.php file template tags, including:
<?php echo get_the_author(); ?>
With the utilization of these functions, integrating the author’s name into your WordPress theme becomes a straightforward process, enhancing your website’s content by providing context and proper attribution.